
Hi crafty friends! As we get closer to Valentine’s I wanted to make something special for my gal-pals. I wanted to make something that says “I appreciate you” and “You’re always on my mind”. So after going through social media for a bit, I came across some treat box ideas – – Click Here to Read More – –
Category: Shabby Chic Decor | Project Ideas
Shabby Chic Decor through paper craft projects. Sandi Nagel shares shabby chic decorating ideas through the use of paper crafts that you can easily make.


Mother’s Day Paper Crafting Ideas
Looking for unique and meaningful Mother’s Day gift ideas? Check out our shabby chic scrapbook and journal paper collections at Decor8YourLife.com! From handmade greeting cards to mini albums and memory boxes, our papers provide the perfect base for creating heartfelt and personalized gifts. Get inspired with our Mother’s Day paper crafting ideas and create a gift that your mom will cherish forever.
Share this:


Create Stunning Handmade Gifts with Spellbinders Stylish Ovals Collection
Learn how to create stunning handmade gifts with our latest paper crafting projects featuring the Spellbinders Stylish Ovals collection. From handmade greeting cards to scrapbook embellishments and a beautiful gift box for Mother’s Day, we’ll show you how to use card stock and paper collections from Decor8yourlife.com to make your own unique creations.
Share this:

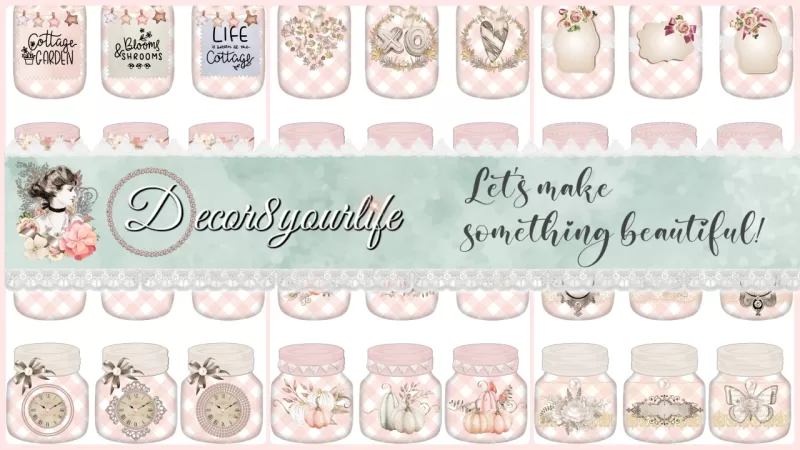
NEW Shabby Chic Mason Jar Ephemera Pack
“Bring a touch of elegant charm to your projects with our Shabby Chic Mason Jar Ephemera Pack!” Introducing our Shabby Chic Mason Jar Ephemera Pack! This unique paper pack is perfect for adding a touch of rustic or elegant charm to any project. Our paper pack includes a variety of – – Click Here to Read More – –
Share this:

Benefits of Digital Scrapbook Papers
Are there benefits to purchasing digital scrapbook papers? If you’re a fan of scrapbooking, you know that one of the most important things is finding the right paper. With so many different brands and types of paper on the market, it can be tough to decide which one is right – – Click Here to Read More – –
Share this:


Introducing A Shabby Beautiful Christmas Paper Collection
Ready, Set, Craft! READYIt’s officially autumn, a cooler breeze is blowing and the leaves are turning to mark the changing of the season. With this change, we put away our spring and summer scrapbook papers, and we dream up of new projects for the upcoming months and holidays! SETLet Decor8yourlife – – Click Here to Read More – –
Share this:


Card Making Tutorial Victorian Style
Card Making Tutorial Victorian Style – In today’s tutorial I show you how you can create a unique and beautiful Victorian style greeting card with items that you may already have in your craftroom.
Share this:


New Card Making Dies
Hello paper crafting friends! Today I’m happy to announce the launch of my very first Dies, Stamps and Paper collection for Craftstash & Co, Dainty Dreams! Visit my blog to read more about it!
